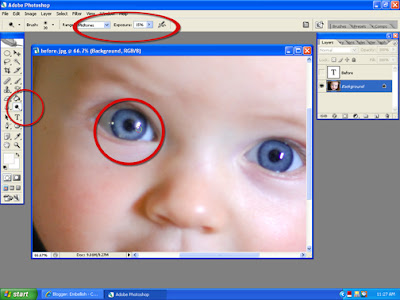
Start off in Photoshop with your photo already "popped" or color corrected. This trick I'm sharing today is usually one of my very last steps.
Select your dodge tool and use a Soft Round brush. Set the Dodge Tool to Midtones and about 15% exposure. Lightly stroke the bottom half of the eye, just a couple strokes. Make your strokes in a crescent moon shape. Be careful~ not too much! While you are at it, stroke the white parts of the eyes too.

Next, select your Burn Tool. Same thing, Soft Brush, Midtones, 15% exposure. Then burn the top half of the eye and iris of the eye. If you are working on a girl's photo, don't be afraid to burn the eyelash line too. I do this!

And here you go! Before and Afters with a blue eyed boy and a darker eyed boy, so you can see the subtle-yet-full of impact eye popping tip this is.


Enjoy! If you use this tip, feel free to leave a comment linking me to your photo! I'd love to see some of these tips in use!
:c)


7 comments:
Awesome tip Andrea! I'm definitely going to try this out when I get a chance.
Oh such a simple but effective tip! thanks!
Thank you so much for this tip!
Thank You for all these tips..it is nice to see that someone likes to help!!
I emailed you about the MidSummer's Night Kit.. :)
Again, THANK YOU!!!!
Hi Andrea,
What a great tip! I tried it on my daughter's photo and it looke awsome. Thank you.
I just recently came across your blog and I checked out your photography website and I wanted to know who created your website. I am from the Miami, Florida area and I'm just starting out with my photography business on a part-time basis and I love your design. I've created websites in the past but I do not know flash. Any help would be appreciated.
Lisa
Great tip (I realy appreciate seeing the before & after pics, which clearly show the benefit of this step).
Leslie
knitterfan1000s@sbcglobal.net
Thanks everyone!
Lisa~ I used a Winklet website~ 023 to be exact! :c)
http://www.winkletwebdesign.com/portfolio.asp
HTH!
Post a Comment